
I know you probably know this intuitively…
But I don’t always see this play out in reality – so I want to set the record straight on one of the most critical gear set-ups you need for your “survival rifle” setup…
… your “optics”.
You see, there’s a massive difference between a “home defense” rifle and a true “survival” rifle.
These differences aren’t small and most people don’t realize them until it’s the wrong moment, and too late.
But fortunately, the fixes are simple when you look at the “why-s” for the various features you choose for tricking out your AR-15 or other rifle for the specific challenges created by an SHTF event, because…
Your “Best Day At The Range” Is Ruining
Your Survival Rifle Optics Setup!
Your Gear Won’t Survive If You’re Lying To Yourself
About The Fantasy Of A SHTF Crisis!
Here’s the thing…
Most people think their rifle setup is “bulletproof” because it works perfectly at their local shooting range.
You show up on Saturday morning, everything’s clean, the lighting is controlled, there’s no weather to worry about, and your gear functions exactly as designed.
Your red dot glows bright, your scope tracks perfectly, and you’re punching holes exactly where you want them.
You walk away patting yourself on the back, thinking you’re “ready for anything”.
Welcome to “fantasy land”, Warrior!
As light-infantry in the 10th Mountain Division’s Rapid-Response Force, I’ve trained (hard!) in every single environment you can think of: deserts, jungles, arctic conditions, rocky mountain terrain, and even urban “wastelands” – in both training and combat.
And let me tell you – real-world survival conditions will destroy your gear in ways you never imagined…
Moisture seeps into optics and fogs them from the inside out due to rain and rapid temperature swings…
Dirt gets into moving parts and jams mechanisms that worked flawlessly yesterday…
Batteries die at the exact moment you need “that shot”…
Physical impacts knock things loose…
And it’s even worse in “defense” scenarios…
You may be “running and gunning”, clearing rooms in a building… then suddenly come under fire from 2-3 blocks away and need to immediately adjust your engagement.
This same plot twist goes for your “survival rifle”…
You might need to take a deer at 300-500 yards in the morning for food… then defend yourself if you’re ambushed by those who heard your shot(s).
Plain and simple, the range doesn’t prepare you for extended field time where your rifle gets banged around, exposed to weather, and stressed in ways that never happen during your weekend trips – and you can either “miss the shot” – or GET SHOT – if your rifle’s optics aren’t set up strategically, which is why…
Your Survival Rifle’s Optics Plan Needs To Have
A “Split-Personality Disorder”
Here’s The Simple 3-Stage Optics Setup For Your Survival Rifle That Spec-Ops And Smart Warriors Use For Real-World SHTF Scenarios…
If I haven’t said it enough, at its very core, “survival” is all about “options” for whatever you’ll need to make it through any kind of scenario for any period of time.
Same goes for your gear and your rifle’s optics – you need “options”, right?
Most people don’t get this – so here are the 3 “stages” you’ll need to prep your optics for…
“Stage 1” Optics: Close Quarters Battle
For “home defense” your rifle’s optics should be optimized for close quarters battle – predictable conditions and predictable distances inside a typical home – maybe 30 feet max from your bedroom to the front door.
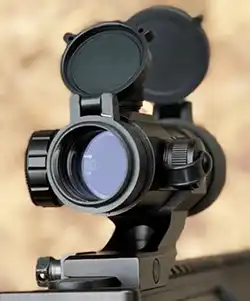
Here’s where the red dot “combat scope” comes in as the “speed demon” of the optics world…
Red dots are inherently quicker than iron sights because of their design – that bright, high-visibility reticle immediately draws your eye.
Trust me on this—in a real CQB gunfight – where “targets” may present themselves from behind any doorway or around any corner – every fraction of a second counts.
In tight quarters, you don’t have time to align your front and rear sights like you do with traditional “iron sights”.
The red dot eliminates that alignment step completely.
Just put the dot on target and squeeze.
Done.
But survival scenarios?
The target you need to engage can be a threat at a longer range, or that deer or other game you need to take out at 300-500 yards away.
Here’s where your next stage of optics come in…
Stage 2 Optics: Long-Range Threats & “MREs” (“Meals Ready for Engagement”)
Red dots can still be effective optics for targets outside of the typical interior of a home – but at longer ranges, your dot may start covering the entire target, making precise shots past 100m or so more difficult.
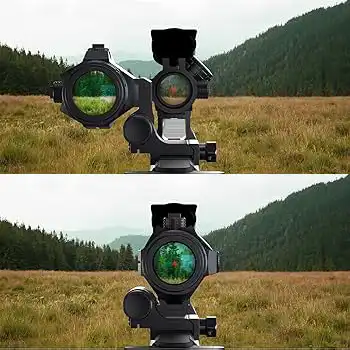
That’s where adding a magnifier becomes your best range-extender.
Just like a traditional “scope”, a magnifier is basically a tube with lenses that magnifies the image downrange.
But rather than your usual scope, a flip-up magnifier gives you the best of both worlds, considering real-world SHTF scenarios…
You might need to take a deer at 300-500 yards in the morning for food… and then defend yourself if you’re ambushed by someone who heard your shot(s).
So, when you need precision for that deer at 250 yards, flip your magnifier into position.
When you need speed for close quarters, flip it out of the way.
In other words, this 2-stage combo gives your rifle optics plan “chameleon superpowers” – deadly accurate at 300-500 yards for hunting… and lightning fast at 25-30 feet for close-quarters defense.
But here’s what most people completely overlook – what happens when this whole system fails you?
Stage 3 Optics: Sh*t Hits The Fan
Here’s the harsh reality that I hardly ever see most “preppers” prepare for…
They assume their primary optic(s) will always work when they need it most.
They’ll spend hundreds (or thousands!) on fancy red dots and scopes, then completely ignore backup systems.
In a true cataclysmic SHTF scenario – where the grid goes down and your local Wal-Mart and Walgreens has been gutted by hoarders and looters – every electronic optic will eventually fail.
That’s just a survival reality, right?
And when it does, your standard “iron sights” are your best backup (but with one minor change)…
Iron sights are purely mechanical sights – no batteries to die… no electronics to fail… no nitrogen purge to leak.
They work in rain, snow, mud, sand, and extreme temperatures.
They don’t care about humidity or condensation because there’s nothing to fog up.

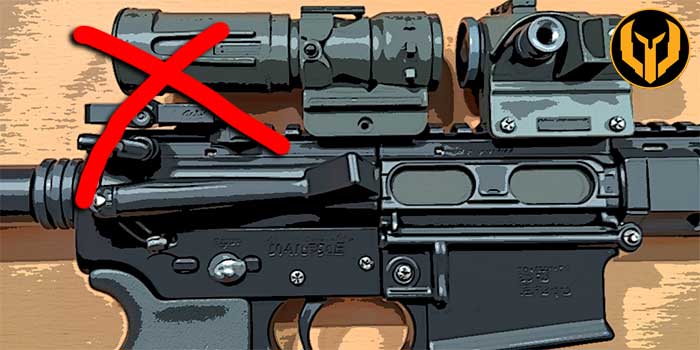
But traditional backup iron sights create their own set of problems…
First, they typically mount in front of and behind your primary optic, which means you need to remove your scope or sight to use them.
You can get around this if you have your irons “co-witnessed” where you can see them through your red dot sight and still pick up your rear and front iron sights.
But moisture (including rain) on your red dot is still going to be an issue for you and will distort your target-acquisition and aim.
Here’s where 45-degree offset, flip-up iron sights become the perfect solution.
These live right alongside your primary optic – mounted at a 45-degree angle on your rail – completely out of the way of your red dot and magnifier setup.
The transition is instant.
Your red dot fails?
Cant your rifle slightly to the left (or right, depending on your setup), and your offset iron sights are right there.
No tools needed. No time wasted. No fumbling with equipment.
Just a slight rifle-cant and you’re back in business!
Don’t Let Your Optics Destroy Your Defense…
If Your Survival Rifle Isn’t Prepared For The Real-World Conditions Of A SHTF Event, You’re Just “Hoping For The Best”!
Remember—a true survival rifle isn’t just about having the right optics…
It’s about planning for their inevitable failure and having systems that work when everything else breaks down.
Look at your current setup right now and be honest…
Are you truly prepared for the worst-case scenario… or just wasting your money on a one-trick pony that’ll leave you horribly disadvantaged when the world crumbles around you?


Excellent advise, I hadn’t thought about that before. I live up on top a mountain ridge and the his information will be out into practice. Thank you for sharing this information.
WISDOM ! Can you post photo’s/video’s of all the items that you talked about Jeff ! It would help us all out to see what you are saying ! Thank you !
Done Michael! Thanks for the suggestion!
Good Afternoon,
I was looking at the page where you order the Red Dot Sight, it looks like he is turning the rifle to the one side.
I do not think this scope would help me, I wear glasses and I think I would have to take a minute or two to refocus after turning my rifle to one side.
Is that correct or am I missing something?
How many scopes, laser’s and flashlights do I need on my rifle?
If I need all of that, where do I put it?
Thank you in advance
Wearing glasses should not have any effect on the move between iron sights and your red dot sight. We have all seen the Hollywood movies where the gangbangers hold their pistol sideways – almost always a bad idea, BTW. With the rifle having a second rail mounted 45° either clockwise or counterclockwise from the principal rail at thd top, switching from one sighting methods to the other is merely a matter of rolling your rifle from one to the other. You do not even need to adjust your grip, simply roll your wrists and lift or lower your elbows a bit. As with anything new, it becomes less awkward the more you practice it.
As long as you don’t knock your glasses while moving, you should be fine. BTW, I happen to be severely myopic (20/2800) and astigmatic as well as now dealing with presbyopia in my advancing years. I put my glasses on before I put my feet on the floor in the morning.
Great response to a great question Agatha!
Couldn’t have said it better myself!
I have my scope canted and my iron sights straight up. Lazer underneath for home defense.
So you took the OPPOSITE approach Wesley?
What benefit have you found with using your iron sights as a primary and scope as backup?
Thanks for the advice. Now I have something else to research! LOL!
It’s all a personal choice JJ.
Consider the scenarios your firearms will be used for and your personal property/home layout (both primary and “plan b” location) and adjust accordingly.